Not too long now

Wednesday 27 October 2010

Back down to earth again

Well the wedding is now over and the day went without a hitch. Even the Scottish weather didn't let us down. My daughter was absolutley stunning, I may be accused of being a little bias there. The only hitch was me :o(
I caught this dreaded cold/flu that is doing the rounds and although we were meant to travel up the Monday before the wedding I did not get up ther until the Thursday. It was a close call!
However I did see her getting married, managed the photo session and then got to the end of the meal and near enough passed out over my dessert!!!
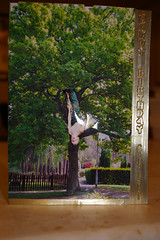
My dearest hubby quickly wheeled me to my hotel room and that was me out for the count until 3o'clock in the morning. I was upset that I did not see her first dance but was so relieved that I actually got to see her getting married. She and her new husband looked so happy as you can see from this photo that was taken by a relative :-


I am sure you will agree that they look a very happy couple. I will post some more photos soon and also take a picture of the complete set of wedding stationery. Her official photos were taken by an ex-colleague of mine. Her blog address is :-


Why not pop along to her blog and see what a talented photographer she truly is. She has a great talent for taking such natural photos and I would recommend her if ever you have the need to hire a photographer.

Wednesday 8 September 2010

The Wedding Invitation


Well here is the photo at last folks of what I have been working on for
the last few months. My daughter's wedding invites. The swirls were done
on my ever trusty Revolution. I could only get this card colour/type in A4
so the flap had to be glued at the back.
The majority of the work was on the inside, which believe it or not, I have
not taken a photograph of yet :o(
But 66 of them have winged their way up to Scotland and have now been
handed/posted out. The card at the top is contact and reply details which
slipped into a little slot inside. All will become clear when I post a photo
of the inside.
I am also so pleased that my daughter's future Mother-in-Law is a talented
crafter and so we have been able to share the workload even although we
live 400 miles apart.

Monkey Card


I made this card for my future son-in-law. Both him and my daughter
are monkey daft.The monkey is from Kanban's Wobbler range.
The background paper is from their CD of the same name. The monkey's
head, as the name suggests, wobbles. It is attached to the card with a
spring made from clear plastic.

Monday 5 July 2010

Bambi card


Bambi and friends were decoupaged. The white card was decorated
using a stamp of a branch and stamped round to enclose Bambi.
The 'grass' is made of several layers of snippedgreen quilling paper.
Simple but effective

Alan's Mum's card


Done with the bookatrix. Had to be a special card for an 83rd birthday!

Border Collie Card


A very simple Kanban card. I LOVE this card as
the image very closely resembles a Border Collie
that was a family pet.

Sunday 4 July 2010

The Great Outdoors


A commercial decoupage was placed on a scene of the Scottish Highlands.
The card was finished off with matching backing paper and a matching badge

The New Irish Baby Card

This was done in decoupage and as befits an Irish baby a lot of green teddies in the
backing paper. I used 'gemstones' to highlight the stars

Inside of green baby card


A few more teddies with an embossed gold-lined inside and
the insert was printed on the computer. I then used a border
punch to decorate the edges and double-sided tape to stick
it into place

champagne card


This card when closed the champagne bottle slid
onto the front of the card

Cliff's Card


This was a photo of the large oak tree outside the house. Cliff, who is a
tree surgeon is seen here hanging upside down from the tree!The photo is
decoupaged and a gold edging with birthday greetings on the side

Angel Birthday Card


This trifold card was tied with ribbon. You can see the angel just peeking out.
On the right-hand side I made a medallion from shrink plastic, glazed it with gold
enamel powder and before it cooled added a metal angel charm.
A hole was made into the medallion before I shrunk it. I attached it to the card
 with some shaped wire and a ribbon.

Inside Angel Card


I was asked to make this card for a lady who is a very strong believer
in angels.The decoupage was mounted on paper taken from a card
 for every day of the year cd, very apt paper for this card!

The Angel originally had Christmas goodies in her basket but
I covered these with Flower soft and made it look like she was holding
a basket of flowers. I intentionally put no stickerson the decoupage so
that the lady I made this for could frame it, which she did.

Dolphin card


The decoupaged dolphins were layered on metallic paper on top of the blue
shiny card. Silver edging and corners were added and the greeting and
name pad were raised with 3d foam

Inside Horse Card


The backing horsey paper complimented the theme of the decoupage.
A typed insert was added with tiny little silver horseshoes and a bottle
and 2 glasses added on 3d foam and coloured in added to the card

Horse Card


This was a very pleasant card to make. The horse scene is in decoupage.

The backing paper was from a cd giving you a paper for every day of the year
to match the person's birthday.
I framed the decoupage, the ribbon had her name in silver letters stuck on as
well as the flower. I also layered the card in matching paper

Monday 21 June 2010

A True Scotsman?


This card was more of a joke with a friend

She kept on asking what was truly worn
under the kilt, so I gave her the answer
inside this sporran :- 'Nothing, it is all in working order'


Another Kanban card but this time an A4 card which made the insert a challege as I only have an A4 printer
so each page of the insert had to be printed out then carefully attached very carefully inside the card. I printed the border and the verse on the right-hand side and on the left-hand side I printed just the same border and applied a rub-on rose

Friday 18 June 2010

For a Special Lady


This card was based around the orchid which was placed on to angel hair with
gold stars inter-mingled with it when the heat was applied to it. As you can see
from the close up both of these were then attached to a circle of embossed pink
satin paper. The base card was covered with a pink velum paper.The insert was
a paper to match the velum jacket. With a cheeky note written inside saying:-

'Belated Birthday Wishes
PS it wasn't really late.
It just took me ages to make
your card'
The card was for a fellow crafter who saw the joke, thankfully.

Baby Card


This was just a very simple but effective baby card

Pearl Wedding Card


This card was embossed at the side and the flowers were made cut out
using a template with the addition of pearl centres.The strings of pearls as
stalks kept the theme of the pearl wedding anniversary.

Baby Boy


The baby in the basket was my first attempt at pergmano and I am
ashamed to say I have never tried it again. I am no good at drawing
and to be able to even trace this picture was indeed a triumph for me

Floral Engagement card


The layer of this decoupage rose was left over from another project.
I placed it on the striped paper which was matted onto a pink metalic
swirl paper then layered on to gold mirror card. A commercial sticky
ribbon and the name of the happy couple finished off this effective but
simple card.

Baby Girl


A basic pink card was layered with pinkgingham and a border of pink paper lace.
A small envelope was placed on the front a 'congratulations' card inside. Finished
off with the topper which, I must confess, was commercially cut with the diamond
pattern. Simples :o)

Handbag Card


This simple card template was covered with a pink mock snake-skin paper.
Slits were made in the top for the ribbon and 'gems' made up the recipients
name as well as decoration for the card. A small diamonte fake buckle was
attached to the flap and the flap was held in place by some velcro.
A small handbag charm was added for the birthday girl to use later.
As the second photo shows the inside is an exploding card which therefore makes
this ideal both as a card and a gift box as it can hold a small piece of jewellery inside

Princess Ella


The design for this card was made from Crafters Companion
CD 'Girls'. I took the decoupage castle design then cut out the
 heart-shaped door and put a photo of the new-born baby behind.


I love these miniature pots. You can glaze them to any
colour to match the card and also add your own choice
of flowers

Lilac Lady


Another elegant lady from Kanban. Just a different fold.
 But instead of just using'gems' to add the finishing touches
 I have filled in the peel-off decorations with Sakura pens.


This card was made for a forum swap. A very basic
decoupage was turned into something a little more
special by putting it under a dome. The embossed
flowers were chalked, and set with hairspray, giving
a soft appearance tot eh finished card.

Elegant Lady


 From the Kanban series of elegant ladies
 I love this range as you can glitter them up
and add gems to give them that little lift

21 today


 This is the first card I made using my
 Cricut. The cartridge was 'George'.
 The 21 was cut out in both mirror and
 glitter paper using the shadow effect.
 The 'Party And' were cut out in glitter
 paper and laid on mirror board, layered
 onto pink glitter paper and then on purple
 glitter paper, I used a rub-on for the
 lettering on the large brad and used small
 letter beads to spell out the name of the
 recipient with various craft boxbits & bobs
 to finish it off

Another First Attempt


 My first attempt at making my own
 iris design. My one mistake was to
 glitter paper that was a tad too thick
 as can be from the photo. But the
 glitter paper gave such a good effect
 for the 'moon' behind the wolf that I
 went with it and the mistake was not
 too obvious when the card was upright

First Attempt


 This was my first attempt at using
 the templates for these folds. I was
 pleasantly surprised at how easy it
 was.
 The card was covered in dark pink
 foil and the cutting out was done on
 light pink glitter paper to give contrast.
 Finished off with a simple flower and
 greeting

Hiking Birthday


I made this card for my daughter's
 intended. He loves hill/mountain
 walking. I took a photo of a highland
 scene which is the main photo. I then
 used this image using 3D Crad Builder
 to make the backing paper. The layering
 paper was made using the same program
 from a map of the West Highland Way
 and also put this onto the little scroll at
 the side and added various pieces
 connected with hill walking to finish it off.